 Few posts ago, I have gone over the procedure needed to get OpenVPN going. However, what about SSTP-based VPN?
Prerequisite for any VPN server is to get certificates sorted. Procedure is exactly the same as for OpenVPN server setup with the slight difference being that common-name really matters. It must match either external IP or external host name – no exceptions.
For completeness sake, I will repeat the certificate creation steps here:
/certificate
add name=ca-template common-name=example.com days-valid=3650 key-size=2048 key-usage=crl-sign,key-cert-sign
add name=server-template common-name=*.example.com days-valid=3650 key-size=2048 key-usage=digital-signature,key-encipherment,tls-server
add name=client-template common-name=client.example.com days-valid=3650 key-size=2048 key-usage=tls-client

sign ca-template name=ca-certificate
sign server-template name=server-certificate ca=ca-certificate
sign client-template name=client-certificate ca=ca-certificate
Depending on your router’s speed, that sign command might time-out – nothing to worry about – just wait for CPU to drop below 100%. Or alternatively check the name of certificate – template part will disappear once signing is completed.
For later shenaningans, we will need root certificate export (just move it somewhere on your computer afterward):
/certificate
export-certificate ca-certificate export-passphrase=""
Next we need a IP address pool for clients. I will assume you have your clients in some other network (e.g. 192.168.1.x) and this new network is just for VPN (notice that it can be the same pool as one used for OpenVPN):
/ip
pool add name="vpn-pool" ranges=192.168.8.10-192.168.8.99
Instead of editing the default encrypted profile, we can create a new one. Assumption is your Mikrotik will also be a DNS server. And while at it, you can create a bit more imaginative user/password (again, if you did this for OpenVPN server, you can just reuse the same profile and user):
/ppp
profile add name="vpn-profile" use-encryption=yes local-address=192.168.8.250 dns-server=192.168.8.250 remote-address=vpn-pool
secret add name=user profile=vpn-profile password=password
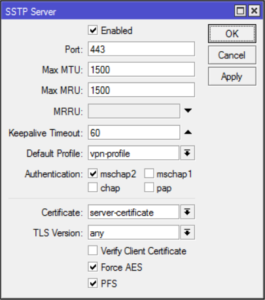
Finally, we get to enable SSTP VPN server interface – first step that is actually needed if you already have OpenVPN server running:
/interface sstp-server server
set enabled=yes default-profile=vpn-profile authentication=mschap2 certificate=server-certificate force-aes=yes pfs=yes
One curiosity is
force-aes flag that is officially
listed as not working with Windows clients. I’ve tested it on Windows 7
and 10 without any issues. You can clear it if you play with something
older.With this, our SSTP VPN server is up and running – onto the client setup!
For client we first need to import our certificate authority and we need to do it a bit roundabout way. First we start MMC (Microsoft Management Console) using
mmc.exe and to it add
Certificates (File->Add/Remove Snap-in). When asked select Computer
account for Local Computer and find Trusted Root Certification
Authorities. Right-click on it will show Import to which we give
certificate we’ve exported a few steps ago.In the Network and Sharing Center now we can go and Set up a new connection. When asked we just select Connect to a workplace and write destination host name (or IP). Remember that it must match certificate common-name (or a matching wildcard) you gave to your server certificate.
If all steps went fine, you should be presented with user name / password prompt and off you go.
PS: Do not forget to adjust firewall if necessary (TCP port 443).
/ip firewall filter
add chain=input protocol=tcp dst-port=443 action=accept place-before=0 comment="Allow SSTP"
[2017-01-26: Adjusted certificate creation to work on RouterOS 6.38 and later]
[2017-01-26: Changed key size to 2048 (instead of 4096) so it doesn’t take ages to generate certificates. :)]
fonte: https://www.medo64.com/2017/01/simple-sstp-server-on-mikrotik/


0 comentários:
Postar um comentário